ffmpeg을 이용한 내장 카메라 영상 실시간 스트리밍 테스트
Lenovo IdeaPad 노트북의 EasyCamera를 이용해서 실시간으로 영상을 캡처하고 스트리밍하는 방법을 알아본다.
[2026-09-07 업데이트] 작성 당시 ffmpeg 4.3 기준이었지만 현재 최신은 ffmpeg 8.x이며, 아래의 DirectShow(dshow) 장치 나열·캡처 방법과 옵션은 그대로 동작한다. 설치는 이제
winget install ffmpeg한 줄이면 된다. UDP 대신 재전송·암호화를 지원하는 SRT(srt://) 출력도 기본 빌드에 포함되어 있어 외부망 전송에는 SRT를 권한다. 글 하단에 관련 내용을 추가했다.
Camera 장치 찾기
먼저 카메라 디바이스의 장치명을 검색하면 아래와 같이 DirectShow 디바이스 목록을 확인할 수 있다.
❯ ffmpeg -list_devices true -f dshow -i dummy

ffmpeg version 4.3.1-2020-10-01-full_build-www.gyan.dev Copyright (c) 2000-2020 the FFmpeg developers
  built with gcc 10.2.0 (Rev3, Built by MSYS2 project)
  . . . (skip build information)
[dshow @ 00000249d77bdb00] DirectShow video devices (some may be both video and audio devices)
[dshow @ 00000249d77bdb00]  "Lenovo EasyCamera"
[dshow @ 00000249d77bdb00]     Alternative name "@device_pnp_\\?\usb#vid_04f2&pid_b50f&mi_00#6&bbc4ae1&0&0000#{65e8773d-8f56-11d0-a3b9-00a0c9223196}\global"
[dshow @ 00000249d77bdb00] DirectShow audio devices
[dshow @ 00000249d77bdb00]  "마이크 배열(Realtek High Definition Audio)"
[dshow @ 00000249d77bdb00]     Alternative name "@device_cm_{33D9A762-90C8-11D0-BD43-00A0C911CE86}\wave_{50CF3892-5049-4249-9E14-B886659C000C}"
카메라 지원 옵션 확인
“Lenovo EasyCamera”가 지원하는 포맷 및 설정을 확인한다.
❯ ffmpeg -f dshow -list_options true -i video="Lenovo EasyCamera"

ffmpeg version 4.3.1-2020-10-01-full_build-www.gyan.dev Copyright (c) 2000-2020 the FFmpeg developers
  built with gcc 10.2.0 (Rev3, Built by MSYS2 project)
  . . . (skip build information)
[dshow @ 0000023d0186e480] DirectShow video device options (from video devices)
[dshow @ 0000023d0186e480]  Pin "캡쳐" (alternative pin name "0")
[dshow @ 0000023d0186e480]   vcodec=mjpeg  min s=1280x720 fps=30 max s=1280x720 fps=30
[dshow @ 0000023d0186e480]   vcodec=mjpeg  min s=1280x720 fps=30 max s=1280x720 fps=30
[dshow @ 0000023d0186e480]   vcodec=mjpeg  min s=800x600 fps=30 max s=800x600 fps=30
[dshow @ 0000023d0186e480]   vcodec=mjpeg  min s=800x600 fps=30 max s=800x600 fps=30
[dshow @ 0000023d0186e480]   vcodec=mjpeg  min s=640x480 fps=30 max s=640x480 fps=30
[dshow @ 0000023d0186e480]   vcodec=mjpeg  min s=640x480 fps=30 max s=640x480 fps=30
[dshow @ 0000023d0186e480]   vcodec=mjpeg  min s=320x240 fps=30 max s=320x240 fps=30
[dshow @ 0000023d0186e480]   vcodec=mjpeg  min s=320x240 fps=30 max s=320x240 fps=30
[dshow @ 0000023d0186e480]   vcodec=mjpeg  min s=160x120 fps=30 max s=160x120 fps=30
[dshow @ 0000023d0186e480]   vcodec=mjpeg  min s=160x120 fps=30 max s=160x120 fps=30
[dshow @ 0000023d0186e480]   vcodec=mjpeg  min s=640x360 fps=30 max s=640x360 fps=30
[dshow @ 0000023d0186e480]   vcodec=mjpeg  min s=640x360 fps=30 max s=640x360 fps=30
[dshow @ 0000023d0186e480]   pixel_format=yuyv422  min s=1280x720 fps=10 max s=1280x720 fps=10
[dshow @ 0000023d0186e480]   pixel_format=yuyv422  min s=1280x720 fps=10 max s=1280x720 fps=10
[dshow @ 0000023d0186e480]   pixel_format=yuyv422  min s=800x600 fps=15 max s=800x600 fps=15
[dshow @ 0000023d0186e480]   pixel_format=yuyv422  min s=800x600 fps=15 max s=800x600 fps=15
[dshow @ 0000023d0186e480]   pixel_format=yuyv422  min s=640x480 fps=30 max s=640x480 fps=30
[dshow @ 0000023d0186e480]   pixel_format=yuyv422  min s=640x480 fps=30 max s=640x480 fps=30
[dshow @ 0000023d0186e480]   pixel_format=yuyv422  min s=320x240 fps=30 max s=320x240 fps=30
[dshow @ 0000023d0186e480]   pixel_format=yuyv422  min s=320x240 fps=30 max s=320x240 fps=30
[dshow @ 0000023d0186e480]   pixel_format=yuyv422  min s=160x120 fps=30 max s=160x120 fps=30
[dshow @ 0000023d0186e480]   pixel_format=yuyv422  min s=160x120 fps=30 max s=160x120 fps=30
[dshow @ 0000023d0186e480]   pixel_format=yuyv422  min s=640x360 fps=30 max s=640x360 fps=30
[dshow @ 0000023d0186e480]   pixel_format=yuyv422  min s=640x360 fps=30 max s=640x360 fps=30
영상 재생 설정
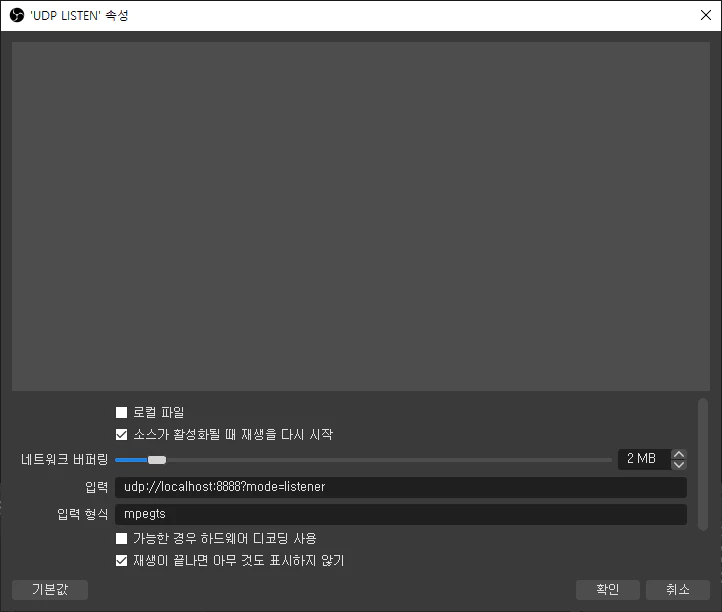
“ffplay” 또는 “OBS Studio”의 Listener 모드를 이용하여 시험 서버를 구성한다.
❯ ffplay udp://192.168.0.19:8888?mode=listener
또는 OBS의 미디어소스에 UDP 리스너를 추가한다.
입력 : udp://127.0.0.1:8888?mode=listener
입력 형식 : mpegts
카메라 영상 MPEG-TS로 스트리밍
ffmpeg의 DirectShow를 이용하여 실시간 스트리밍을 위한 파라미터를 설정해본다.
[dshow @ 0000023d0186e480] pixel_format=yuyv422 min s=800x600 fps=15 max s=800x600 fps=15
-s 800x600 -r 15
-pixel_format yuyv422
-i video=”Lenovo EasyCamera”:audio=”마이크 배열(Realtek High Definition Audio)”
-c:v h264_nvenc -c:a aac
-f mpegts
❯ ffmpeg -f dshow -s 800x600 -r 15 -pixel_format yuyv422 -i video="Lenovo EasyCamera":audio="마이크 배열(Realtek High Definition Audio)" -c:v h264_nvenc -c:a aac -f mpegts "udp://localhost:8888"

ffmpeg version 4.3.1-2020-10-01-full_build-www.gyan.dev Copyright (c) 2000-2020 the FFmpeg developers
  built with gcc 10.2.0 (Rev3, Built by MSYS2 project)
  . . . (skip build informations)
  Guessed Channel Layout for Input Stream #0.1 : stereo
Input #0, dshow, from 'video=Lenovo EasyCamera:audio=마이크 배열(Realtek High Definition Audio)':
  Duration: N/A, start: 860269.261000, bitrate: N/A
    Stream #0:0: Video: rawvideo (YUY2 / 0x32595559), yuyv422, 800x600, 15 fps, 15 tbr, 10000k tbn, 10000k tbc
    Stream #0:1: Audio: pcm_s16le, 44100 Hz, stereo, s16, 1411 kb/s
Stream mapping:
  Stream #0:0 -> #0:0 (rawvideo (native) -> h264 (h264_nvenc))
  Stream #0:1 -> #0:1 (pcm_s16le (native) -> aac (native))
Press [q] to stop, [?] for help
[dshow @ 000001d9b16ae5c0] real-time buffer [Lenovo EasyCamera] [video input] too full or near too full (94% of size: 3041280 [rtbufsize parameter])! frame dropped!
Output #0, mpegts, to 'udp://localhost:8888':e=-577014:32:22.77 bitrate=  -0.0kbits/s speed=N/A
  Metadata:
    encoder         : Lavf58.45.100
    Stream #0:0: Video: h264 (h264_nvenc) (High 4:4:4 Predictive), yuv444p(progressive), 800x600, q=-1--1, 2000 kb/s, 15 fps, 90k tbn, 15 tbc
    Metadata:
      encoder         : Lavc58.91.100 h264_nvenc
    Side data:
      cpb: bitrate max/min/avg: 0/0/2000000 buffer size: 4000000 vbv_delay: N/A
    Stream #0:1: Audio: aac (LC), 44100 Hz, stereo, fltp, 128 kb/s
    Metadata:
      encoder         : Lavc58.91.100 aac
frame=  195 fps= 15 q=23.0 Lsize=    3894kB time=00:00:13.50 bitrate=2362.4kbits/s speed=1.02x
video:3521kB audio:213kB subtitle:0kB other streams:0kB global headers:0kB muxing overhead: 4.271006%
[aac @ 000001d9b1732240] Qavg: 262.491
[2026-09 추가] 요즘 방식: SRT 스트리밍
UDP/MPEG-TS는 같은 LAN에서는 충분하지만, 패킷 손실이 있는 구간(외부망)에서는 화면 깨짐이 잦다. 최신 ffmpeg에 기본 포함된 SRT(Secure Reliable Transport)는 재전송과 암호화를 지원해 같은 명령 구조에서 URL만 바꾸면 된다.
# 송신 (listener)
❯ ffmpeg -f dshow -s 800x600 -r 15 -pixel_format yuyv422 -i video="Lenovo EasyCamera" -c:v h264_nvenc -f mpegts "srt://0.0.0.0:8888?mode=listener"

# 수신 (caller)
❯ ffplay "srt://<송신PC IP>:8888?mode=caller"
수신 측을 여러 명에게 열어야 하면 MediaMTX 같은 경량 미디어 서버에 SRT/RTSP로 밀어 넣고 WebRTC/HLS로 재배포하는 구성이 요즘의 표준적인 방법이다.
참고 URL
- FFmpeg DirectShow
- Capturing your Desktop / Screen Recording
- FFmpeg StreamingGuide
- FFmpeg dshow device format list